RGB LED Strip Controller

This project is great for backlighting monitors, or adding customizable LED strips to a PC tower that you can easily change with a few different inputs!
This tutorial will show you how to put together an interactive display of RGB LEDs using three Wireling inputs to change the LED color, the number of LEDs lit up, the position of the illuminated LED segment, and the brightness of the LEDs.
New to Wirelings? Learn more about the Wireling platform!
Materials
In order to interface with any Arduino-based board, you'll need the Arduino IDE.
There are multiple processor/adapter combinations that can be used with Wirelings. Use the following table to find the combination that works for you.
| Processor | Adapter |
|---|---|
| * and | |
| * | |
| * | |
| N/A | |
| * | N/A |
| Arduino |
* These processors have a 32-pin connector and can have multiple Wireling Adapter TinyShields stacked to increase the number of Wireling ports up to a maximum of 32 total Wireling ports.
Hardware used in this project
- WirelingZero Processor
- Micro USB Cable
- Capacitive Touch Wireling
- Rotary Switch Wireling
- RGB LED Strip
- 0.1" Breakout Wireling (used to create an RGB LED strip Wireling)
- Joystick Wireling
- (4) Wireling Cables
- Rechargeable Battery (Optional)
Software
- Arduino IDE
- Wireling.h Library (You can download this from GitHub as linked, or from the Library Manager in the Arduino IDE)
- ATtiny841 library
- SX1505 library
- RGB LED Controller Arduino Sketch
Making a Wireling
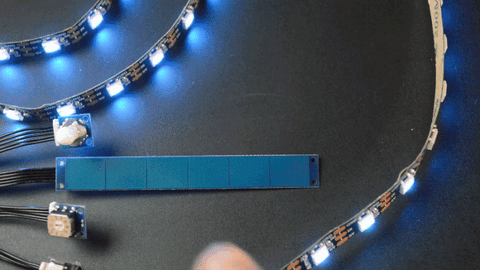
The RGB LED strip is not a Wireling, but with a 0.1" Breakout Wireling, it is easy to make it one!
All you need to do is make soldered connections from GND, 3V3, and INT to the matching labeled 0.1" Breakout Wireling.
For this project, we attached wires between the Breakout Wireling and the LED strip. Optionally, you could skip the Breakout Wireling and solder the Wireling cable wires directly to the LED strip.

Step 1: Assembly (Hardware)
Use Wireling Cables to plug your Wirelings into the ports indicated in the table below. (You can change these ports within the included Arduino Sketch using the Wireling.selectPort() function.)
NOTE: Be mindful when inserting Wireling Cables - the connector pins inside the 5-pin connectors on Wirelings can be bent when cables are inserted at an angle.
| Wireling Port Assignments | |
|---|---|
| Port 0 | |
| Port 1 | |
| Port 2 | |
| Port 3 | |

Assembled Hardware (battery optional)
Make sure the processor is powered on and connect the hardware to your computer using a Micro USB cable.
Step 2: Software (Setup)
For this project, you will need to download the ATtiny841 library as well as the SX1505 library. To install an Arduino library, check out our Library Installation Help Page.
Make the correct Tools selections for your development board. If unsure, you can double-check the Help page that mentions the Tools selections needed for any TinyCircuits processor.
Step 3: The Code
The program used in this project can be downloaded above under Software. After downloading the program, unzip the files and open the code in the Arduino IDE. Plug in the appropriate USB cable for your development board of choice (if you haven't already) and upload the code!
Once the program is uploaded, watch the LEDs change as you interact with the input Wirelings:
Port 1: Capacitive Touch - drives the brightness of the LEDs
Port 2: Rotary - drives the color of the LEDs

Port 3: Joystick - drives the position with one direction, and number of LEDs shown in the other

Any number of LEDs can be present in your project with an LED Strip or string of RGB LED Wirelings, just be sure to specify the quantity via the NUM_LEDS definition in the code.
Contact Us
As always, if you have any questions or feedback, feel free to email us at info@tinycircuits.com.
Show us what you make by tagging @TinyCircuits on Instagram, Twitter, or Facebook so we can feature it!
Thanks for making with us!